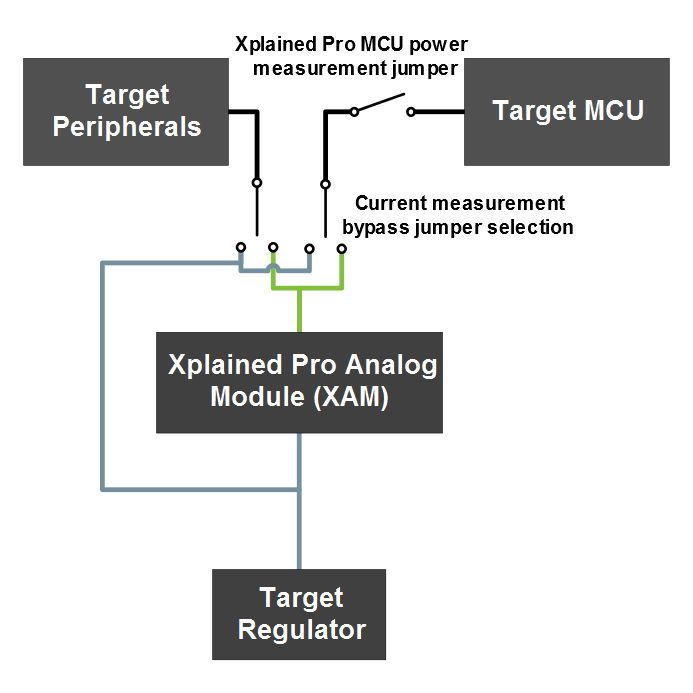
On the ATtiny3217 Xplained Pro, the MCU and the MCU peripherals (e.g., extensions) are powered by their own regulator, as shown in the figure below. All the other parts of the board, mainly the embedded debugger and the accompanying Xplained Pro Analog Module (XAM), are powered from a separate regulator. The current to the MCU and the peripherals can be measured by connecting them to the XAM output through jumper settings.
Figure 1. ATtiny3217
Xplained Pro XAM Implementation Block
Diagram
On the ATtiny3217
Xplained Pro the XAM can be used in four configurations:
- 1.No current measurement or external MCU current measurement: The XAM is bypassed and, thus, the MCU and peripherals are supplied directly by the regulator. Set both jumpers in the “BYPASS” position. In this configuration, it is also possible to connect external measurement tools on the Xplained Pro MCU power measurement header to measure the MCU current directly instead of using the XAM.
- 2.MCU current measurement: The XAM measures only the MCU current while the peripherals are supplied directly by the regulator. For this configuration, place the jumper for “I/O” (peripherals) into the “BYPASS” position and the “MCU” into the “MEASURE” position.
- 3.Peripherals measurement: The XAM measures only the peripherals’ current while the MCU is directly supplied by the regulator. For this configuration, place the jumper for “MCU” into the “BYPASS” position and the “I/O” jumper into the “MEASURE” position.
- 4.MCU and peripherals measurement: In this configuration, both the MCU and the peripherals are measured by the XAM. Place both jumpers on the “I/O” and “MCU” headers in the “MEASURE” position.