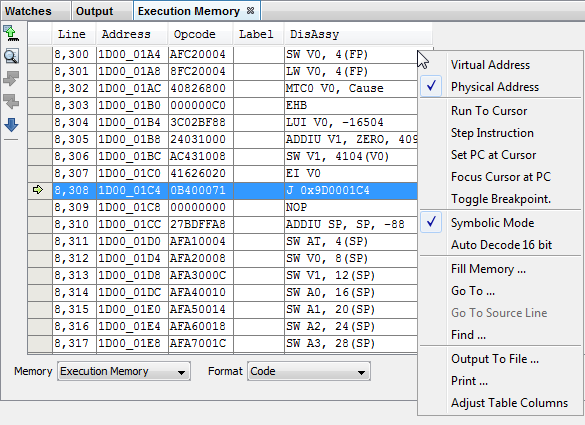
The Execution Memory window displays locations in the range of program and/or data memory for the currently selected 32-bit device.
For the MPLAB X Simulator, when an execution memory value changes or the processor is halted, the data in the Execution Memory window is updated.
For any Microchip hardware debug tool (e.g., MPLAB ICD 4 in-circuit emulator), when an execution memory value changes or the processor is halted, the data in the Execution Memory window is not updated; you must do a Read of device memory.
You may specify how memory is displayed in the window by selecting from the Format drop-down box on the bottom of the window.
When using a hardware tool for debug, some registers may show an “R” for each nibble of data to represent a reserved resource.
Code Format
This format displays execution memory information as hex code. The window will have the following columns:
Data Format
This window will have the following columns:
Icons are located on the left side of the window.
Icon | Icon Text | Function |
---|---|---|
![]() |
Refresh by Read Device Memory | Same function as the Debug toolbar “Read Device Memory” icon - uploads device memory to the MPLAB X IDE. |
![]() |
Find | Specify a string to find in the window. Select to match whole word or case. |
![]() |
Find Next | Find next instance of string from Find. |
![]() |
Find Previous | Find previous instance of string from Find. |
![]() |
Go To | Go to specified line number or address. |
Right click in the memory window data area set to CODE FORMAT to pop up this menu. Not all items may be visible for all 32-bit MCUs.
Item | Description |
---|---|
Virtual
Address (KSEG[0:1]) |
Select virtual addresses for display. See your device data sheet for details. |
Physical Address | Select physical addresses for display. |
Run to Cursor | Run the program to the current cursor location. |
Step Instruction | Perform a step instruction. |
Set PC at Cursor | Set the Program Counter (PC) to the cursor location. |
Focus Cursor at PC | Move the cursor to the current PC address and centers this address in the window. |
Toggle Breakpoint | Toggle (on/off) existing breakpoint. |
Symbolic Mode | Display disassembled hex code with symbols. |
Auto Decode 16 bit | Use MIP16 / microMIPS instruction decoding. See your device data sheet for details. |
Fill Memory | Fill
memory from Start Address to End Address with the value in Data. Specify other options in the Fill Memory dialog. |
Go To | Go to the address/function specified using the Go To dialog. |
Go To Source Line | Go to the corresponding line in source code in the editor. |
Find | Find text specified using the Find dialog. |
Output To File | Write the displayed window contents to a text file using the Output to File dialog. |
Print the
contents of this window using the Print dialog. Note: If you have a
large memory device, the number of pages printed can become very
large. A suggestion is to print the window contents to a file
(Print dialog, General tab, “Print to File” check box)
and then select which pages from the file you need to
print.
|
|
Adjust Table Columns | Adjust the columns automatically. |
Right click in the memory window data area set to DATA FORMAT to pop up the menu. Not all items may be visible for all 32-bit MCUs.
Item | Description |
---|---|
Virtual
Address (KSEG[0:1]) |
Select virtual addresses for display. See your device data sheet for details. |
Physical Address | Select physical addresses for display. |
Hex Width Display | Set the
hexadecimal display width. (Options depend on the device selected). Example: One byte, e.g., 00 01 02 ... 0E 0F Two bytes, e.g., 00 02 04 ... 0C 0E Four bytes, e.g., 00 04 08 0C |
Fill Memory | Fill memory
from Start Address to End Address with the value in Data. Specify other options in the Fill Memory dialog. |
Go To | Go to the address/function specified using the Go To dialog. |
Find | Find text specified using the Find dialog. |
Output To File | Write the displayed window contents to a text file using the Output to File dialog. |
Import Table | Import tabular data from a file into a Memory window using the Import Table dialog. |
Export Table | Export tabular data from a Memory window into a file using the Export Table dialog. |
Print the
contents of this window using the Print dialog. Note: If you have a
large memory device, the number of pages printed can become very
large. A suggestion is to print the window contents to a file
(Print dialog, General tab, “Print to File” check box)
and then select which pages from the file you need to
print.
|
|
Adjust Table Columns | Adjust the columns automatically. |